Search This Blog

Tuesday, April 29, 2014

How to use narrow long closets - layout

I have a very long narrow closet that has two ends that are deep and hard to reach. I dont want just shelves on both sides because then I'm losing hanging space. 
However, Recently I discovered an idea that may fix my problem by using two curved rodded shelves on both sides and still having a long clothes rod through the middle. 


Heres my closet layout. 


This curved rod can be bought here: Amazon link
In my design you will need 4.


I Recommend either one of these for support. My guess is that the second one will work best, however it is more expensive. 
In my design you will need 8.

Image one link : Amazon
Image two link : Amazon


To attach it you will need to put up a shelf on both ends. and then screw it into the bottom so that it is hanging down as indicated in my layout. I recommend a curved shelf but a straight one will work ok too. Remember that your shelf will be holding lots of weight so you will need to make sure that it is bracketed and sturdy.

I recommend 4 of these: Amazon link


Or you could skip my whole curved idea and go with the cheaper version by using a straight rod and shelf:


Wednesday, April 23, 2014

How to Upgrade memory ( RAM ) on iBook G4

Step 1.
Turn off iBook.


Step 2.
Slide down the two tabs on keyboard.


It should look like this:


Step 3.
Pull back keyboard, Dont completely lift up (flex cable is attached), tip it towards you so that the bottom is still touching iBook. You can then gently lay keyboard down.


Step 4.
Remove the 4 small philip screws.


Step 5.
Disconnect Airport cable.


Step 6. 
Remove Airport card. There is a clear plastic tab to pull back with. Lift slightly since there is a wire keeping it from sliding, but try not to lift too much.


Step 7.
Now that you have the Airport out you can lift metal plate. Just flip over with cable still attached.


Step 8.
Your Finally to the memory card! Hard parts over! 
Now just gently unclip from both sides and then slightly lift and slide out. 


Step 9.
Once you have the old card out, slide the new one in by tipping the gold end down and into the slot. Use either your finger or gently use a small flat head screw driver to pull tabs out. 


Make sure that the gold part of card is slid in as much as possible or else it may show up on iBook that it has less memory.

Step 10. 
Test it out before putting it all back together, just to make sure memory card is in all the way. 
To test turn iBook on (I recommend connecting Airport cable before turning on.) and click apple on the top left corner of screen and select "about Mac", then check if memory is what it should be. 

If it says less memory than its supposed to, then turn iBook off and try lifting card slightly and pushing it in. Test once again. 

 Here is a before and after of sliding the card in all the way. 

Before.

After

Finally, Once the memory is correct, retrace steps 8-2 backwards and put everything back where it came from.  
Your done! :)


Tuesday, April 22, 2014

How to Remove Facebook, CWTV, and Many More Site Ads

I love this app! I have been using for around 2 years now and I can't imagine being without it! I can watch CWTV online without all the interrupting commercials and I don't have to see the random ads on the side of my facebook. It also blocks so many other ads and pop ups!! In my book its a MUST HAVE.


Step 1.
You need Google Chrome browser!
 Download here: https://www.google.com/intl/en/chrome/browser/


Step 2.
Sign in to a google account. 
To get there go here: https://accounts.google.com
(If you don't have an account I highly recommend creating one! Its easy!)


Step 3.
Go to Chrome Webstore and search for "Adblock" or you can just click this link and it will take you there. 

Step 4. 
Click the blue "+ FREE" button.

Step 5.
It will then ask if you want to Add "Adblock". Click "Add".


Finally, it should then download and show up like this on the top right of your browser -


ENJOY! :)


How to Forward Yahoo mail to Gmail

Step 1.

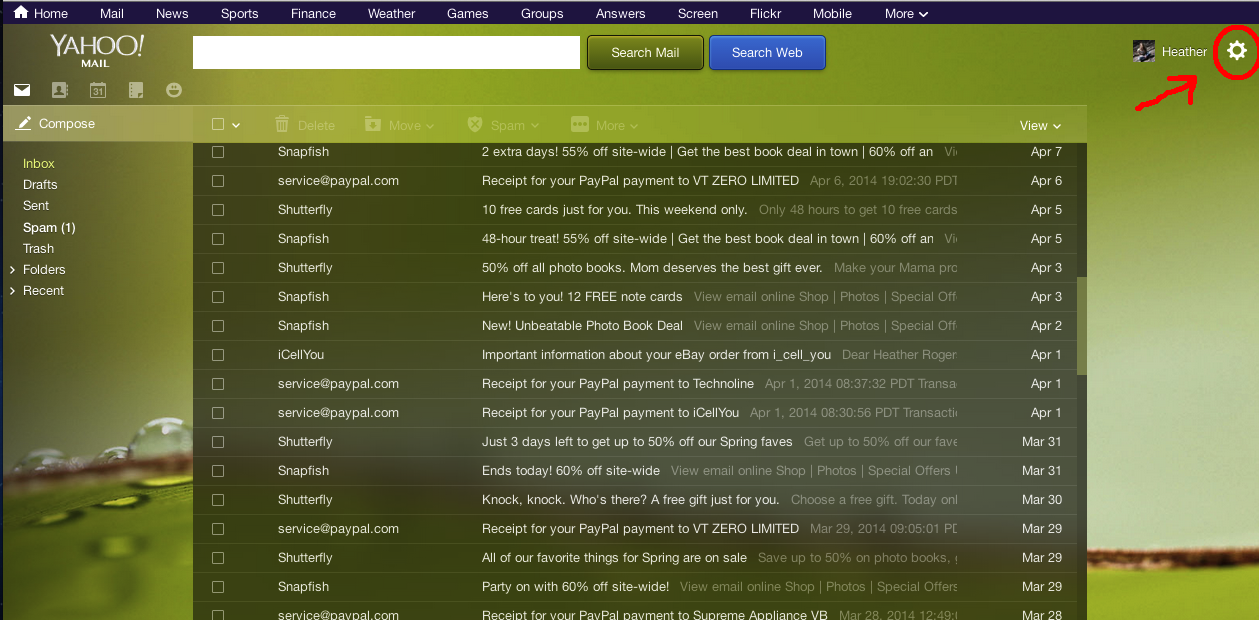
Go to your Yahoo mail. 


Step 2.
Select the gear icon.


Step 3. 
Click "Settings".


Step 4.
Click "Accounts" tab.


Step 5.
Click "Edit" button. 

Final Steps.

Select the "Forward" Option.

Then below that put your email address that you want to receive all your emails. 

Lastly, click SAVE. 


Thats it your done! No more having to check multiple accounts! :)